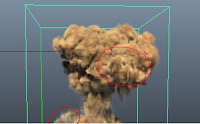
Ohk , the Final Render. Detail description about my process will follow shortly.
BreakDown:
Introduction:
While learning Maya Fluids I thought of creating a shot with explosion in it. This shot helped me to explore more about basic Fluid Container parameters and how they can be varied for specific needs, although there are things which I still do not understand :)
Final Simulation Time for all elements: 18 hours
Total Rendering Time: 10 hours
Post /Compositing: 5 hours
Investment of time to Explore is a Must:
Maya Fluid Container has numerous parameters which are inter-dependent and this makes it hard
to notice the impact of a change made. To avoid confusion, it is must to experiment,explore with small simulations and explore them first before they can be implemented in the major shot.
There were some Hardware constraints while simulating the explosion, so I was extra-cautious in making most of the MegaHertz on the Machine I have.
Here is the specification of the machine:
Video Card Specs:(Click on to view it in Original Size)

Computer Specs:
To explore more about Maya Fluids I found following resources quite helpful:
Cg-Talk Forums:
http://forums.cgsociety.org/showthread.php?f=86&t=741591&page=1&pp=15
http://forums.cgsociety.org/showthread.php?f=86&t=757114&page=1&pp=15
http://forums.cgsociety.org/showthread.php?t=933045
http://forums.cgsociety.org/showthread.php?f=86&t=859380
Duncan's Corner:
http://area.autodesk.com/blogs/duncan/
David Schoneveld:
https://vimeo.com/agentfx
Soup:
http://soup-dev.websitetoolbox.com/
This is an interesting website to search for new plug-ins or addons not only for the Maya Fluid but for the entire Maya Software in general. I will try the "Uprez" Fluid utility once my new computer will finish rendering.
Intial Thoughts:
With my computer specifications in mind and being new to the Maya Fluids, I decided to separate
Explosion shots in to different elements so to experiment and learn more through different set-ups.
Following are the shot elements:
Main Explosion
Major ShockWave
Ground Dust
Debris Smoke Trails
Major issue with the Maya Fluid is that when cached it cannot be re-timed to slow down the motion of the Fluid. This is because of the non-linear relationship in between the Input parameter like Density with the output Parameter Opacity. Simple and thorough explanation for the same can be found here:
http://forums.cgsociety.org/archive/index.php/t-884414.html
Following are the ways I found to slow down the Fluid Motion:
1 Keying down simulation rate- This is not good for lengthy simulations as it causes unexpected fluid Behaviour.
2 Playing back entire simulation at less speed- This will change the intial shape alogwith the motion.
3 The third and the most effective way which I tried but didn't used is the one given by Eric Cloutier.
He describes about his method on the following link:-
http://forums.cgsociety.org/showthread.php?t=927014
he is retiming fluid simulation for slow motion scene requirements while mantaining the shape of
the fluid. This method produces a very smooth fluid scaled down in motion as can be seen here:
http://www.youtube.com/watch?v=YjSoEE59kOo
This didn't worked for me as the cache created by this method was never loaded on my poor computer with only 1.2 Gb of RAM.
Simulation Set-Up:
Fields:
It is important to include fields initially in the Fluid Simulation as fields are applied to voxels with higher density, therefore if one adds fields later after simulating the fluid then results may be unexpected.
Field for Main Explosion:
For Main Explosion I used a Volume Axis field which was key-framed to give that extra push to the fluids.
This is it's set-up for the Main Explosion(around and along axis have a value of 0.5 each):
1. No Impact on the Fluid as shown by dotted arrows:

2 Pushing Fluid towards Camera for few frames:
3. Moving Fluid Upwards and a bit of circular motion around the axis shown by the thin line-spacing:
Fields for Shock-Wave:
Volume-Axis Field-
I used Volume Axis Field with Sphere Shape which had -ve Y direction, was away from center and around axis with some positive values.This set up again made fluid to push away from center and at the same time
making it swirl around the center.
Turbulence Field-
I used Turbulence Field with Higher frequency to add more smaller and detail noise to the Fluid look
besides that high phase values made it change quite often within frames.
Fluid Containers:
Container For Main Explosion:
Resolution and size for this Fluid container was 80,90,90, as the system started crashing above this resolution for my simulation. I wished to had more height at same X and Z scale values but failed to achieve so.
The Boundary was set to -ve Y with X and Z set to None.
All grids are set to Dynamic except Fuel as I am not emitting Fuel in to the Fluid.
Dynamic Simulation:
All Default except :
Damp was set to 0.001, didn't keyed it, controlled fast moving fluid through bouyancy parameter of each Fluid Grid. This was easier and gave better results than the other way around.
High Detail Solve was set to All grids except Velocity, as this keeps the simulation more stable while having drastic swirl values for longer run.
Simulation Rate scale of 3.0.
Content Detail parameters:
All Parameters are set to default except:
Buoyancy of temperature and density being keyed to control and hold Fluid motion with
no Dissipation and Diffusion.
Temperature turbulence with a value of 5 was used to create some randomness in hot regions(regions with
more temperature Grid values) which were shaded out by using Incandescence ramp.
Velcoity Swirl was set to 10 .
Shading Parameters:
Edge Dropoff was keyed to avoid the obvious cube shape of the Fluid touching container's boundaries.

Set up for the ramps can be seen from the snapshot.
It's important to know that this incandescence ramp will be visible for the fluid where it has extreme temperature grid values. The dark side of the incandescence ramp will give a way to the color ramp to shade out the fluid.
Moreover, it is the Color ramp which interacts with light , leading to shadows and other effects.
There is slightly brighter color value on the incandescence ramp on the extreme left which gets added to the color ramp to lit those high turbulent and relatively hot temperature grid values in the fluid. As can be seen this adds contrast to the fluid by separating darker and lighter regions.
In order to avoid a sharp falloff one can use a darker color value on the extreme left of the incandescence ramp next to the brighter value. This will result in a nice and smoother blend among ramp color values.
Texturing:

Lighting:
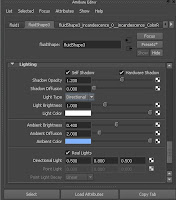
I rendered the entire cached Fluid simulation on the other machine with Maya 2011 installed.
As Maya 2011 has option to add ambience to the fluid this can be use to fake effects like multi-scattering or adding atmosphere to the fluid.
Configuration for shock wave's container is almost same as the one for the main explosion with few tweaks here and there.
Issues:
I re-timed the fluid cache in Maya 2011 with a new Time node, however while doing a batch render the render output was showing the same frame.
Along with this there was an issue with the Debris Smoke Trails which I did using Maya-Particle system.
These were different in the Batch render from what I'd in the simulation in the view-port.
I found a workaround for this by rendering out each pass separately using "Preview animation" feature inside Option tab when Mental Ray is selected as the renderer.
Preview Animation will render exactly the same animation as seen in the viewport and save it inside the "temp" folder of the current project directory.
Debris Smoke Trail:
To shade particles with cloud type I used Dave's video tutorial on Vimeo as a reference.
https://vimeo.com/5429867
Post/Compositing:
Post work was done in Nuke by adding camera shake, glow and compositing all Fluid elements together.
Camera Dust Particles :
Here is a small update on the explosion WIP.
This is a low resolution video.
I will add debris and dust to complete this. After rendering the explosion I just got to know that there are few nice additions in context to lighting fluids under Lighting category inside Maya 2011, so I might re-render it for better results.
Hi,
I am starting this thread to post of some of my learning experience with Maya Fluids.
Thanks for all information available regarding Maya Fluids all over CgTalk, which had made it slightly easier for beginners like me to learn Fluids in Maya.
To start with here is a small PlayBlast of Explosion and a Fire WIP, I did in Maya 2010, will post up the details once I am done with the Texturing, Rendering and Compositing.
A Fire WIP:
BreakDown:
Introduction:
While learning Maya Fluids I thought of creating a shot with explosion in it. This shot helped me to explore more about basic Fluid Container parameters and how they can be varied for specific needs, although there are things which I still do not understand :)
Final Simulation Time for all elements: 18 hours
Total Rendering Time: 10 hours
Post /Compositing: 5 hours
Investment of time to Explore is a Must:
Maya Fluid Container has numerous parameters which are inter-dependent and this makes it hard
to notice the impact of a change made. To avoid confusion, it is must to experiment,explore with small simulations and explore them first before they can be implemented in the major shot.
There were some Hardware constraints while simulating the explosion, so I was extra-cautious in making most of the MegaHertz on the Machine I have.
Here is the specification of the machine:
Video Card Specs:(Click on to view it in Original Size)


To explore more about Maya Fluids I found following resources quite helpful:
Cg-Talk Forums:
http://forums.cgsociety.org/showthread.php?f=86&t=741591&page=1&pp=15
http://forums.cgsociety.org/showthread.php?f=86&t=757114&page=1&pp=15
http://forums.cgsociety.org/showthread.php?t=933045
http://forums.cgsociety.org/showthread.php?f=86&t=859380
Duncan's Corner:
http://area.autodesk.com/blogs/duncan/
David Schoneveld:
https://vimeo.com/agentfx
Soup:
http://soup-dev.websitetoolbox.com/
This is an interesting website to search for new plug-ins or addons not only for the Maya Fluid but for the entire Maya Software in general. I will try the "Uprez" Fluid utility once my new computer will finish rendering.
Intial Thoughts:
With my computer specifications in mind and being new to the Maya Fluids, I decided to separate
Explosion shots in to different elements so to experiment and learn more through different set-ups.
Following are the shot elements:
Main Explosion
Major ShockWave
Ground Dust
Debris Smoke Trails
Major issue with the Maya Fluid is that when cached it cannot be re-timed to slow down the motion of the Fluid. This is because of the non-linear relationship in between the Input parameter like Density with the output Parameter Opacity. Simple and thorough explanation for the same can be found here:
http://forums.cgsociety.org/archive/index.php/t-884414.html
Following are the ways I found to slow down the Fluid Motion:
1 Keying down simulation rate- This is not good for lengthy simulations as it causes unexpected fluid Behaviour.
2 Playing back entire simulation at less speed- This will change the intial shape alogwith the motion.
3 The third and the most effective way which I tried but didn't used is the one given by Eric Cloutier.
He describes about his method on the following link:-
http://forums.cgsociety.org/showthread.php?t=927014
he is retiming fluid simulation for slow motion scene requirements while mantaining the shape of
the fluid. This method produces a very smooth fluid scaled down in motion as can be seen here:
http://www.youtube.com/watch?v=YjSoEE59kOo
This didn't worked for me as the cache created by this method was never loaded on my poor computer with only 1.2 Gb of RAM.
Simulation Set-Up:
Fields:
It is important to include fields initially in the Fluid Simulation as fields are applied to voxels with higher density, therefore if one adds fields later after simulating the fluid then results may be unexpected.
Field for Main Explosion:
For Main Explosion I used a Volume Axis field which was key-framed to give that extra push to the fluids.
This is it's set-up for the Main Explosion(around and along axis have a value of 0.5 each):
1. No Impact on the Fluid as shown by dotted arrows:

2 Pushing Fluid towards Camera for few frames:


3. Moving Fluid Upwards and a bit of circular motion around the axis shown by the thin line-spacing:
Fields for Shock-Wave:
Volume-Axis Field-
I used Volume Axis Field with Sphere Shape which had -ve Y direction, was away from center and around axis with some positive values.This set up again made fluid to push away from center and at the same time
making it swirl around the center.
Turbulence Field-
I used Turbulence Field with Higher frequency to add more smaller and detail noise to the Fluid look
besides that high phase values made it change quite often within frames.
Fluid Containers:
Container For Main Explosion:
Resolution and size for this Fluid container was 80,90,90, as the system started crashing above this resolution for my simulation. I wished to had more height at same X and Z scale values but failed to achieve so.
The Boundary was set to -ve Y with X and Z set to None.
All grids are set to Dynamic except Fuel as I am not emitting Fuel in to the Fluid.
Dynamic Simulation:
All Default except :
Damp was set to 0.001, didn't keyed it, controlled fast moving fluid through bouyancy parameter of each Fluid Grid. This was easier and gave better results than the other way around.
High Detail Solve was set to All grids except Velocity, as this keeps the simulation more stable while having drastic swirl values for longer run.
Simulation Rate scale of 3.0.
Content Detail parameters:
All Parameters are set to default except:
Buoyancy of temperature and density being keyed to control and hold Fluid motion with
no Dissipation and Diffusion.
Temperature turbulence with a value of 5 was used to create some randomness in hot regions(regions with
more temperature Grid values) which were shaded out by using Incandescence ramp.
Velcoity Swirl was set to 10 .
Shading Parameters:
Edge Dropoff was keyed to avoid the obvious cube shape of the Fluid touching container's boundaries.

Set up for the ramps can be seen from the snapshot.
It's important to know that this incandescence ramp will be visible for the fluid where it has extreme temperature grid values. The dark side of the incandescence ramp will give a way to the color ramp to shade out the fluid.
Moreover, it is the Color ramp which interacts with light , leading to shadows and other effects.

There is slightly brighter color value on the incandescence ramp on the extreme left which gets added to the color ramp to lit those high turbulent and relatively hot temperature grid values in the fluid. As can be seen this adds contrast to the fluid by separating darker and lighter regions.
In order to avoid a sharp falloff one can use a darker color value on the extreme left of the incandescence ramp next to the brighter value. This will result in a nice and smoother blend among ramp color values.
Texturing:

Settings for the texturing can be found on the right,
I avoided using animated texture origin and texture time as the
fluid was moving faster enough for the texture motion to be noticed. Besides this,coordinate method was set to grid which was sufficient enough to provide different texture values for all voxels.
Lighting:

I rendered the entire cached Fluid simulation on the other machine with Maya 2011 installed.
As Maya 2011 has option to add ambience to the fluid this can be use to fake effects like multi-scattering or adding atmosphere to the fluid.
Configuration for shock wave's container is almost same as the one for the main explosion with few tweaks here and there.
Issues:
I re-timed the fluid cache in Maya 2011 with a new Time node, however while doing a batch render the render output was showing the same frame.
Along with this there was an issue with the Debris Smoke Trails which I did using Maya-Particle system.
These were different in the Batch render from what I'd in the simulation in the view-port.
I found a workaround for this by rendering out each pass separately using "Preview animation" feature inside Option tab when Mental Ray is selected as the renderer.
Preview Animation will render exactly the same animation as seen in the viewport and save it inside the "temp" folder of the current project directory.
Debris Smoke Trail:
To shade particles with cloud type I used Dave's video tutorial on Vimeo as a reference.
https://vimeo.com/5429867
Post/Compositing:
Post work was done in Nuke by adding camera shake, glow and compositing all Fluid elements together.
Camera Dust Particles :
Here is a small update on the explosion WIP.
This is a low resolution video.
I will add debris and dust to complete this. After rendering the explosion I just got to know that there are few nice additions in context to lighting fluids under Lighting category inside Maya 2011, so I might re-render it for better results.
Hi,
I am starting this thread to post of some of my learning experience with Maya Fluids.
Thanks for all information available regarding Maya Fluids all over CgTalk, which had made it slightly easier for beginners like me to learn Fluids in Maya.
To start with here is a small PlayBlast of Explosion and a Fire WIP, I did in Maya 2010, will post up the details once I am done with the Texturing, Rendering and Compositing.
A Fire WIP: